Wednesday, October 26, 2011

"The Art Of Star Wars Toys Photography Exhibition" Photos


Courtesy of Seno Haryo
www.photomotion-online.com


Courtesy of Seno Haryo
www.photomotion-online.com

This is my favorite scene from this exhibition. I really enjoyed the process of making this shot. Seno Haryo finalized this photograph with his awesome skills that made this piece of art looked so amazingly realistic.


Courtesy of Seno Haryo
www.photomotion-online.com


Courtesy of Seno Haryo
www.photomotion-online.com

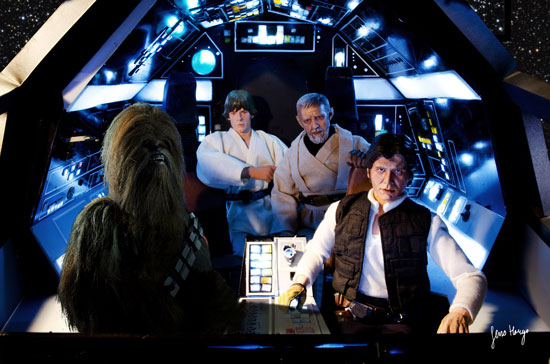
This cool looking diorama is made by Aldo Khalid a.k.a Godoftoy. One of the most respected guy in toys and hobbies community in Indonesia. Also an owner of ZERO Toys Museum Bandung. I really admire his detail efforts and lot of passions that he puts in this diorama. This diorama stands for itself and no doubt about it. Complete with blinking L.E.D this diorama looked awesome and so realistic. If you're fanboy enough you could notice that these Sideshow 1:6 scale Obi Wan Kenobil and Han Solo figures are repainted. The artist behind these repainted figure was DUABELAS Kitbasher. Check out his awesome works by clicking the link provide.


Courtesy of Seno Haryo
www.photomotion-online.com

Jango Fett and Mace Windu final battle

Here are some of the pictures from my recent diorama projects. In this exhibition I had a chance to collaborate with Seno Haryo from Photomotion, a talented promising photographer and fellow member of ORDER 66_S.I.T.H Community in Indonesia. What make me also honored was, this photography exhibition received a national record from MURI (Indonesian Record Museum) as the first toys photography exhibition to be held in Indonesia.

This event is supported by SACCA Production as a leading event organizer that concentrate making toys, comics, cosplay and extreme hobbies related events. ORDER 66_S.I.T.H. as the largest Star Wars Fans Community in Indonesia, IDS for the exhibition and workshop venue. As Seno Haryo's almamater, IDS fully supported this event. Not only the great venue's facility but also with their cooperative team. Big thanks to them!

Star Wars Lars Garage Diorama Part II

Courtesy of DK's publishing
This book is my all time reference book. Every pages always make me drooled. The illustrations are done amazingly awesome! One of my "bible" reference in making Star Wars diorama.

After a view corrections on the back wall color the diorama is ready to go. I'm happy with the result and really look forward to photograph this diorama together with the 1:6 scale C-3PO & R2-D2 figures.

I test shot this diorama for color reference. I oftenly photographed my diorama for color composition and correction. As you can see I used flash light in this picture.

I placed 1:6 scale Hasbro C-3PO figure for coloring match. I do this for color composition, it's just my method of coloring. Also I used color composition for camera wise. As you can see this is a shot with available light.

This finishing stage is 80% done.

Here are the production picture series of my Star Wars Lars Garage diorama. As you can see in this stage the finishing process was almost done. I used this Star Wars: Complete Locations book for scenery and color reference. This DK's publishing book is one of my many favorite books that I oftenly use for "bible" in making Star Wars diorama. The cross section detail illustrations done by Hans Jensen & Richard Chasemore are amazingly awesome!

Friday, October 21, 2011

Star Wars Lars Garage Diorama Part I

This stage shows the finishing step, preparation for base coat painting.

This stage shows the transformation of details on the back wall.

Some of Star Wars freaks would notice that detail parts on the back wall is not featured in the original movie. True! I improvised the scenery due to the lack of space of display. I had to manuever the design a little bit. Also you can notice the circumference of the base also smaller than the original scenery in the movie.

Notice that I alreaday attached the back wall. I used a 1mm sheet of ABS plastic for easy bending.

The early days of construction. I scratch built this diorama from a 3mm of PVC sheet.

Here are the pictures from my recent diorama projects that I've done in several weeks ago. As you can see some of the pictures are the project's production process. From scratch build to finish. The figure that I used for scaling is 1:6 scale Hasbro's C3PO figure.

This diorama is my interpretation of Star Wars-Episode IV's Lars home garage scene and one of "The Art of Star Wars Toys Photography Exhibition" diorama series.

Wednesday, August 31, 2011

Master Chief HALO Costume Props


Fresh from the oven costume props

I wasn't very happy for the bottom parts. Though I like the final result of the color. I had to mix some different type of green colors in order to find the exact color that I was looking for.

Finishing step process done. As you can see I added some scrathes and battle damage style like the original costume.

Finishing step production process

Early production step process

As I promised several days ago, here are the production step process pictures of my Master Chief HALO costume props which I made on last February 2011.

The brief was simple, the owner asked me to make a replica costume of the original Master Chief HALO costume belts. Some dude rented this costume set from him a year ago and he didn't return the cotume in complete sets. The missing parts were the belts set.
These costume props was set for the cosplay session at 7th Jakarta's Toys and Comics Fair last March 2011.

I wasn't quite happy for the result. Especially for the lack of detail in bottom parts. Due to the lack of time, I had to pull this costume without details, which I don't like. I'm planning to repair this belts for the next upcoming event.

The Art Of Star Wars Toys Photography Teaser

You can also check this teaser video for this upcoming exhibition www.youtube.com/watch?v=PcIJy_IThb0 of my recent diorama projects in collaboration with Seno Haryo from www.photomotion-online.com .

Seno is an Indonesian rising photographer, well known for his passion in Star Wars toys photography. You can see his recent toys photography works from the link above. Chek out his awesome photography works!


Sunday, August 28, 2011

NERF-Vulcan Repaint Project

Original color before the make over
(courtesy of www.hasbro.com)

I repainted the ammo box with an army green color for realistic war impression of this futuristic looking rifle. I also added some weathering and battle scratches effects.

Pictures seen above are one of my many projects that I did on last February 2011 for the 7th Jakarta's Toys and Comics Fair event. It was one hell of busy month for me..

A good friend of mine, Riza Satyagraha owner of this event and also who happens to be the owner of Toyzone, The Action Figures Headquarter (www.toysoneshop.com). One of the Jakarta's awesome must visit toystore in town. Whenever you got a chance to visit Jakarta, Indonesia look for this place. This place is so whatever fanboy ever dreamed of. The Droids Coffee and Grill on the first floor and a massive collections of toy store on the second floor. Here is some link to get the look of how cool of this place www.facebook.com/pages/The-Droids-Coffee-and-Grill .

Anyway, for this 7th Jakarta's Toys and Comics Fair 2011 event he commissioned me this NERF repaint project. He wanted this cool looking rifle to be repainted in battle damage style without further modification. Though i really tempted to do some modifications. But hey, I'll do that when I got my own next time! He planned this rifle for cosplay session in his event. This cool looking rifle get paired with Master Chief HALO costume. Which I'll be posting the Master Chief HALO costume pictures very soon.

Hope you enjoy them!

DISCLAIMER:
All images shown in this page is not related nor associated with the respected copyright owners of this NERF N-Strike brand. This page is for hobby related use only.

Sunday, August 14, 2011

Sneak Preview for upcoming exhibition


1:6 scale props that I developed for the photo exhibition props

1:6 scale Star Wars Biker Scout Sideshow figure with dioking scenery shot in front of bluescreen

1:6 scale Star Wars R2-D2 Hasbro figure in dioking scenery

Early days exhibition photo shoot production

Here are the teaser pictures from my recent diorama projects in collaboration with Seno Haryo from www.photomotion-online.com . Seno is an Indonesian rising photographer, well known for his passion in Star Wars toys photography. You can see his recent toys photography works from the link above.

Me and Seno are also members of Order66-S.I.T.H (Staw Wars Indonesian Troopers Homebase) community, order66sith.blogspot.com . One of the largest Indonesian Star Wars fans base community. We share the same passion in Star Wars. I met him two years ago at the Hellofest event, one of the biggest Indonesian gig for graphics and advertisings. We met a couple of times at the Order66-S.I.T.H gatherings.

On last July 2011 he texted me and asked me if we could meet and discuss something about diorama. I met him and he told me his plan about arranging an exhibition. The exhibition is about 1:6 scale Star Wars toys photography. We agreed to collaboate and I support him with my diorama and scenery for the photo shoot productions.

He is now preparing a series of 30 photo scenes for this upcoming exhibition, my dioramas will also be exhibited at this event on September 17-24, 2011 at iDs (International Design School), Epicentrum Walk 3rd floor, South of Jakarta, Indonesia. Will be performing also a multitalent artists, Godoftoy (Aldo, ZERO Museum Toys, Bandung) and Qory Hally.

JABANG TETUKO Scale Miniature Sets Production II

Jabang Tetuko Live Multimedia Show covered in KOMPAS, an Indonesian's leading newspaper
(courtesy: KOMPAS)

Silamatangkep Gate early construction step

Silamatangkep Gate conceptual sketch

Khayangan Palace early construction step

Khayangan Palace conceptual sketches

Here are the Jabang Tetuko's production pictures that I promised on my earlier post. As you can see I constructed these miniatures from scrathes. Due to the budget issues I had to use 3mm cardboard as a basic construction and 5mm polystyrene foam as their skin and body for easy carving.

Like any other projects that I've done before, I always draw a conceptual design sketches as a guideline. Since the client didn't give me the exact brief so I had to come up with my own version of Khayangan Palace, Pringgadani Palace and Silamatangkep Gate. I googled and found some references and combined them with my own ideas. Overall the client was happy and I heard that the show was a success and covered in many medias. As you can see I attached a Silamatangkep Gate picture during the show that I photographed it from KOMPAS, Indonesian leading newspaper.

DISCLAIMER:
All images and design are copyrighted by their respected owners.

JABANG TETUKO Scale Miniature Sets Production


Pringgadani Palace in finishing progress


Pringgadani Palace in early progress

Pringgadani Palace conceptual sketch

Here are the Jabang Tetuko's production pictures that I promised on my earlier post. As you can see I constructed these miniatures from scrathes. Due to the budget issues I had to use 3mm cardboard as a basic construction and 5mm polystyrene foam as their skin and body for easy carving.

Like any other projects that I've done them before, I always draw a conceptual design sketches as a guideline. Since the client didn't give me the exact brief so I had to come up with my own version of Khayangan Palace, Pringgadani Palace and Silamatangkep Gate. I googled and found some references and combined them with my own ideas. Overall the client was happy and I heard that the show was a success and covered in many medias. As you can see I attached a Silamatangkep Gate picture that I photographed it from KOMPAS, Indonesian leading newspaper.

DISCLAIMER:
All images and design are copyrighted by their respected owners.

SHREK make over diorama project part II

The coloring step is done

I redo the base coat for best result

White spots are putty to cover scratches

SHREK diorama before make over

Here are the step by step pictures of my SHREK diorama make over project. As you can see I had to repaired the scratches and repainted them. Adding some artificial plantation and my custom made artificial grass for realistic looks.

Saturday, August 13, 2011

SHREK make over diorama project


Princess Viona, Baby Shrek and Shrek

On March 2010 I made this diorama for our bestfriend's son, Karan. The diorama was for Karan's 1st birthday present. Karan's parents are a huge fan of SHREK trilogy. They collected their SHREK figures from McDonalds kiddy meals.

When I developed this SHREK diorama, dioking wasn't even establish yet. I still doing this diorama thingy as a side job. I worked very late after office hours and sometime didn't have enough sleep to finish this diorama. As the result, the diorama didn't finish completely as I expected. I was ashame of the result but Karan's parents didn't find anything wrong about the diorama. They were happy but I wasn't.

I promised my self that day that I had to do something to make the diorama looks better. A year and a half past, until I got the chance to make over this diorama. dioking already established as a studio that specializes in making diorama, miniature, scale models and movie props. So now this is a full time job and I have much more time to focus on this SHREK diorama make over.

I've added some grass, branches, plantations to bring some realistic looks.

I'm pleased with the final make over result and I hope Karan's parents will do so.

Custom Made Wedding Frame

A closer look of the toys themed frame

Toys themed frame on display

A closer look of the motorcycle themed frame

Motorcycle themed frame on display

These pictures shown above are a custom wooden picture frame that I specially made for my good friends, Toma & Meita at their wedding day on last April 16th 2011.

The brief was simple. Toma is into whatever related to classic bikes and toys. And he wanted to present something different for his wife at that special day. These frames are considered as dioking's first wedding souvenir's project. We rarely do picture frames, but for a friendship we'll do everything :).

For their special day, I developed a series consist of three artworks.
1. Motorcycle parts themed custom wooden frame.
2. Toys parts themed custom wooden frame.
3. Wall-E diorama as a wedding dowry (I'll be posting the pictures very soon)